
OOMWOO — Build Your Own Open-Source Robot Vacuum Cleaner with ROS2 and LiDAR
OOMWOO — Build Your Own Open-Source Robot Vacuum Cleaner with ROS2 and LiDAR
What is OOMWOO?
OOMWOO is an open-source, DIY robot vacuum cleaner you build yourself using off-the-shelf parts, a 3D-printed chassis, and the Robot Operating System 2 (ROS2). With 4372 GitHub stars in just over a month, it has captured the maker community's imagination by promising a truly local, cloud-free, vendor-independent vacuum that you own from the PCB up.
The name "OOMWOO" is a rotational ambigram — it reads the same when flipped 180°, just like the robot roaming your floor in every direction. Sponsored by makerspet.com and remake.ai, the project is built entirely in public with a modular, community-driven design.
Why is it Trending?
Robot vacuums have become a commodity, but they come with strict vendor lock-in. Your Roomba sends maps to the cloud. Your Dreame phone-home for features. OOMWOO flips this: every line of code, every PCB trace, every 3D-printed part is open. You can repair it, upgrade the LiDAR, replace the motors, or add a robotic arm — all without asking permission.
The timing is perfect: affordable 2D LiDAR sensors, powerful single-board computers, and mature ROS2 tooling have converged to make a DIY vacuum genuinely competitive with consumer models.
Architecture Overview
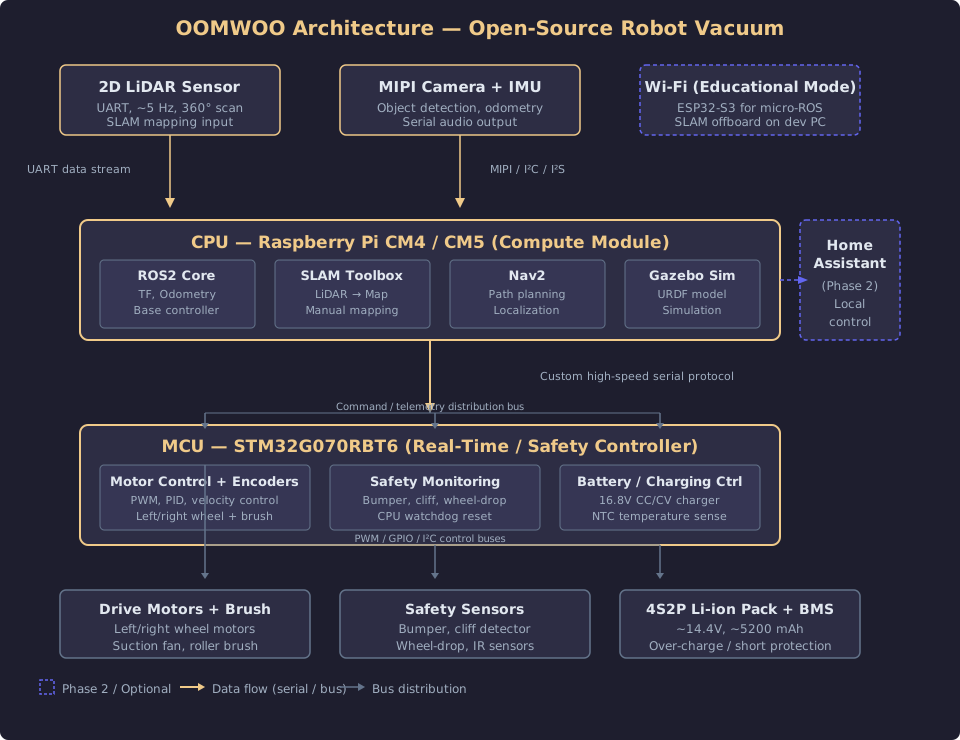
OOMWOO uses a dual-processor split architecture that mirrors how commercial vacuums are built, with a critical design principle: safety never depends on Linux or ROS2.
CPU (Compute Module)
- Raspberry Pi CM4 or CM5 (or any pin-compatible module: Radxa CM3, Pine64 SOQuartz)
- Runs ROS2, SLAM Toolbox for LiDAR-based mapping, and Nav2 for autonomous navigation
- Handles LiDAR data (UART, ~5 Hz), camera feeds (MIPI), and IMU processing
- Minimum target: 4 GB RAM (2 GB stretch goal via ROS2 node composition)
- Cooling via the suction fan's airflow — no dedicated fan needed
MCU (Real-Time / Safety Controller)
- STM32G070RBT6 running FreeRTOS with static memory allocation
- Owns all motors, encoders, bumper/cliff/wheel-drop sensors, and battery charging control
- Communicates with the CPU via a custom high-speed serial protocol (not micro-ROS)
- Hard safety lives here: independently stops motors on bumper hit, cliff detection, or wheel-drop; current-limits a stuck brush; watchdogs the CPU
Sensors and Actuators
- 2D LiDAR (UART, ~5 Hz, 360°) for SLAM mapping
- MIPI camera(s) for future object detection and obstacle avoidance
- IMU for odometry and orientation
- Drive motors (left/right wheels), suction fan, and roller brush
- Bumper, cliff detector, wheel-drop sensors, IR sensors
Power
- 4S2P Li-ion battery pack with built-in BMS (~14.4 V, ~5200 mAh / ~75 Wh)
- Charged via 16.8 V CC/CV with NTC temperature sensing
Smart Home Integration
- Native Home Assistant support (Phase 2)
- Optional educational profile: swap the CM4/5 for an ESP32-S3 running micro-ROS, with SLAM processed offboard on a dev PC over Wi-Fi
Prerequisites
Before diving in, you'll need:
| Component | Details |
|---|---|
| Compute | Raspberry Pi CM4/5 (4 GB+) or pin-compatible module |
| MCU | STM32G070RBT6 or similar (on the I/O carrier board) |
| LiDAR | Affordable 2D LiDAR (supported by kaiaai/LDS libraries) |
| Chassis | 3D printer (FDM, ~349 mm round body) |
| Motors | Sourced wheel motors, suction fan, roller brush |
| Battery | 4S2P Li-ion pack with built-in BMS |
| Software | ROS2 Humble or later, Ubuntu 22.04+/Debian 12 |
| Skills | Basic electronics, 3D printing, ROS2 fundamentals |
Note: The hardware BoM is still being finalized. For now, you can start with the simulation environment described below.
Setting Up the Simulation Environment
Even without physical hardware, you can run the OOMWOO robot in a Gazebo simulation. This lets you test SLAM mapping, navigation, and cleaning behavior entirely in software.
1. Install ROS2 and Gazebo
Follow the official ROS2 installation guide for your platform:
# Ubuntu 24.04 example
sudo apt install software-properties-common
sudo add-apt-repository universe
sudo apt update && sudo apt install ros-jazzy-desktop python3-rosdep
sudo rosdep init && rosdep update
echo "source /opt/ros/jazzy/setup.bash" >> ~/.bashrc
source ~/.bashrc
2. Clone the OOMWOO Simulation
git clone https://github.com/makerspet/oomwoo-one.git
cd oomwoo-one
rosdep install --from-paths src --ignore-src -r -y
colcon build
source install/setup.bash
3. Launch the Gazebo Simulation
ros2 launch oomwoo_one gazebo.launch.pyThis launches the robot in a residential-layout world with:
- Full URDF model (~349 mm round chassis)
- LiDAR sensor publishing scan data
- Differential drive controller
- Odometry and TF frames
4. Teleoperate the Robot
In another terminal:
ros2 run teleop_twist_keyboard teleop_twist_keyboardUse the keyboard arrows to drive the simulated vacuum around.
5. Run SLAM for Mapping
ros2 launch slam_toolbox online_async.launch.pyWatch the LiDAR scan lines build a map of the simulation environment in real time.
6. Install the Full Development Environment
For the complete OOMWOO development setup:
git clone https://github.com/makerspet/oomwoo-install.git
cd oomwoo-install
./install.sh
This installs all dependencies including ROS2 packages, SLAM Toolbox, Nav2, and the URDF model.
How to Contribute
OOMWOO is built entirely by the community. The project is organized into modules that can be worked on independently:
| Module | Status | Description |
|---|---|---|
| URDF + Gazebo Sim | ✅ In progress | Robot model, simulation world, sensor plugins |
| Clean and Map | 🟢 Ready | Coverage cleaning while SLAM-mapping |
| Dock Cycle | 🟢 Ready | Undock, return-to-dock, precise docking |
| Recovery Behaviors | 🟢 Ready | Safety ladder, pause-and-alert, stuck detection |
| Floor Handling | 🟢 Ready | Edge cleaning, carpet detection, mop control |
| I/O PCB | ✅ In progress | KiCad carrier board with CM4 socket + STM32 |
| Compute Benchmark | ✅ In progress | Memory reduction, ROS2 composable nodes |
To contribute: pick a module, announce it in GitHub Discussions, build it in your own repo, and send a short PR linking it. The best solution for each module surfaces over time.
Architecture Diagram
The architecture diagram above illustrates the complete system design:
- Top row: 2D LiDAR, Camera/IMU/Audio, and optional Wi-Fi (educational ESP32-S3 mode)
- Upper middle: CPU running ROS2 Core, SLAM Toolbox, Nav2, and Gazebo Sim
- Lower middle: MCU handling motor control, safety monitoring, and battery/charging
- Bottom row: Drive motors, safety sensors, and battery pack
- Right side: Home Assistant integration (Phase 2)
Data flows from sensors → CPU (via UART, MIPI, I²C) → MCU (via custom serial protocol) → motors and actuators. A bus distribution pattern ensures clean routing without crossing arrows.
OOMWOO vs Commercial Alternatives
| Feature | OOMWOO | Roomba j7+ | Dreame X40 Ultra |
|---|---|---|---|
| Open source | ✅ Full | ❌ Proprietary | ❌ Proprietary |
| Cloud dependency | ❌ None | ✅ Required | ✅ Partially |
| LiDAR SLAM | ✅ 2D LiDAR | ❌ Camera-based | ✅ Yes |
| Home Assistant | ✅ Native | ❌ Via hack | ❌ Via hack |
| Repairable | ✅ 3D-printable | ❌ Disposable | ❌ Difficult |
| Cost (DIY) | ~$200-400 | ~$600 | ~$1000 |
| ROS2 | ✅ Native | ❌ | ❌ |
Resources
- GitHub Repository
- Architecture Documentation
- ROS2 Simulation Tutorial
- OOMWOO Installation Scripts
- URDF Package
- Community Discord
- Official Website
- Makerspet Tutorials
OOMWOO is at the design/RFC stage. The simulation environment is ready today — jump in, contribute a module, and be part of building the world's first truly open robot vacuum.